
Click to download the complete XS manual
1 LOGGING IN INTO XS
To log in to XS, open an internet browser (Google Chrome, Safari, Internet Explorer, Microsoft Edge etc.). You can log into XS via the link https://login.xpertsuite.nl/Account/LogOn
Once you have successfully logged in, you will be taken to the “Start Page”. The start page offers, among other things, an overview of messages, trajectories, actions you can perform and tasks to be completed.
1.1 LOGIN PROCESS
Below you will see the login screen for XS
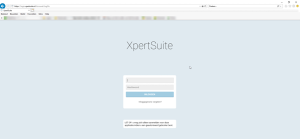
In the center of the screen, you can enter your username and password (together known as logincredentials).
After entering your validated login credentials, the next step is to set up the mandatory 2-factor authentication (2FA). The 2FA is a process for better security of personal data where you can choose from several options: an SMS code, a yubikey (USB) code or an authentication app.
2FA consists of two elements and always includes a login with login credentials, followed by 1 (or more) choices from three available options. These are described in the following sections:
- SMS verificatie code
- YubiKey code
- Een authenticator app
1.2 SMS CODE
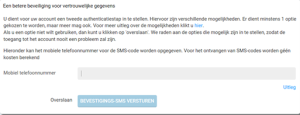
When you choose to register a mobile phone number as a 2FA method, you can enter your cell phone number in the screen as shown below. The SMS code will consist of letters and numbers only (no capital letters).
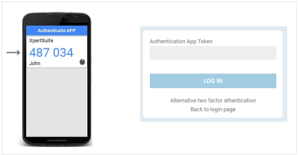
1.3 2-FACTOR AUTHENTICATIE APP ON YOUR SMART PHONE
The third and final 2FA option is an Authenticator app. An authentication app generates a one-time code (“token”) that you can enter manually in your login screen. Authentication apps can be installed on any device that supports apps, ranging from phones to tablets and more. A list of authentication apps can be found at the end of this chapter.
When you use the chosen app to scan a supplied barcode during the initial login, the one-time password generator for XS is added into the app.
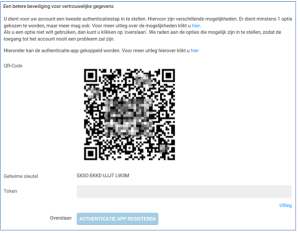
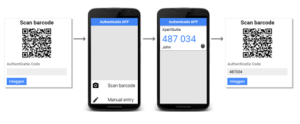
U hoeft alleen de barcode te scannen bij de eerste login instelling. Daarna dient u de gekozen authenticatie app te openen en kunt u de getoonde XS-code zoals hieronder getoond invullen:
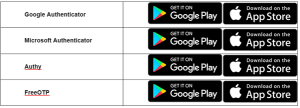
Een lijst van veel gebruikte authenticatie apps ziet u hieronder:
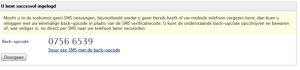
1.4 BACKUP CODE
Once you have set up your authentication options you will see a backup code on your screen. This code can replace your specified 2FA method if you do not have your phone or YubiKey. The image below shows an example of a backup code.
By clicking ‘Stuur een SMS met de back-upcode’ you can send a text message with the code to your mobile phone.
2 HOMEPAGE
The button in XS leads you to the home screen. In the next chapter, we cover some of the things you can find on the home page.
2.1 BROWSING THROUGH XS
When navigating in XS, it is important that you only use the buttons in the XS screen. This means that the browser buttons do not provide valid actions (e.g. the button to go back in the browser)
You can click the button to return to the home screen or the button to return to the File Overview. The system alerts you when you may lose entered data.
In most situations, you will see a CANCEL or SAVE button in XS that you can use.

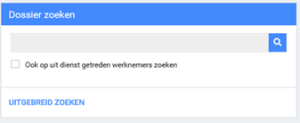
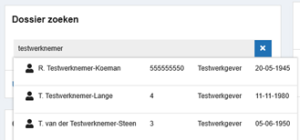
2.2 SEARCH FUNCTION (DOSSIER ZOEKEN) – SEARCHING AN EMPLOYEE
On the home page, you will see the search function that allows you to look up employees. You can search by various search terms (name, date of birth). Enter the reference in the gray text box, click on the search icon (magnifying glass) and select the desired employee from the list of results. Click UITGEBREID ZOEKEN to show the details.
2.3 TASK LIST (TAKEN)
On the start page you will see the overview with all the tasks to be performed and assigned to other users. Clicking on a task in this list opens the complete list of tasks to be performed. You can also filter this complete list by ), for example “All own tasks” (alle eigen lopende taken) or “All tasks” (alle taken
2.4 ACTION BUTTONS
With the action buttons at the top right of the home page , you can immediately perform various actions.
2.5 ABCENSE TRAJECTS
In the start screen you will find an overview of all current trajectories,, divided into trajectories for Absence and trajectories for Pregnancy with the number of processes indicated in red.
2.6 OVERVIEW PAGE (OVERZICHT)
In het tabblad “Overzicht” (Overview) vindt u de recente trajecten en alle relevante informatie over de betreffende medewerkers.
![]()
This includes the following information:
- The recent trajectories/ absence history of this Through the different icons there is a shortcut for notes, tasks and documents
- The general data of the employee
- Personal notes
- If necessary, a temporary home address
- Contact details of the supervisor
- The current employment
2.7 TASKS (TAKEN)
In the tab “Tasks” you can find all information regarding current tasks: tasks still to be performed and tasks issued (to others).
![]()
On this page you have the possibility to show one specific trajectory or the tasks of all (current) trajectories. You also have the possibility to use the filter. It is recommended to keep the filter “All own urgent tasks
2.8 THE TRAJECTORY FILE (TRAJECTENDOSSIER)
In the tab “Trajectendossier” you can find all relevant information/documents of a (current) trajectory.
![]()
The data in question is the following:
- Xpert Suite documents: here you can find the documents that are created and stored within
- Invitations: invitations for an appointment with the company doctor are stored here
- Imported documents: here all documents that a user uploads separately are
- Overview documents:
- Contact moments overview: overview containing all notes;
- Progress report: contact details employee and Arbodienst;
- Overview reintegration activities: here are all activities related to the trajectory who performed them and when this happened;
- Appointments overview: overview of appointments with the company doctor
- Notes
2.9 FILE AUTORISATIONS (DOSSIERAUTORISATIE)
The “File Authorisations” tab lists – if applicable – the assigned case manager and company physician who can handle the files.
![]()
MESSAGES (BERICHTEN)
The “Messages” tab takes you to the DialoogXpert.
![]()
3 Reporting sick leave (through Howden)
You have taken out an absenteeism insurance policy through Howden. You report sick leave via Verzekerd Inzicht.
The sickness and recovery reports you submit there are automatically forwarded to Vitaal Ondernemen through the integration and will appear in XpertSuite (XS)
Pregnant
If an employee is pregnant, please register this in VI is soon as possible.
Also make sure you report the pregnancy to the UWV.
Sick due to pregnancy
If an employee is absent due to pregnancy-related sickness, please report this in VI
(Partial) recovery
If the employee returns to work fully or partially after sickness, you can report the employee as fully or partially recovered in VI
4 REPORTING SICK (Not Howden clients)
There are two ways to report an employee sick.
- Via the button Sick (ZIEK) in the start screen
- Via searching for the employee in the start screen Both ways are described below.
Reporting sick via the sick button
Select the employee and click on NAAR ZIEKMELDEN In the next screen you can register sick leave.
Choose an absence classification, complete all requested information, and click SAVE.
Please note that medical terms are not allowed in the note field. The sick note is now registered. You will then see an overview of all tasks scheduled in the sick leave process.
When reporting a female employee sick, you will be given the option to mark the option ‘Sickness due to pregnancy’. Once you do that, you will also need to fill in more details about the pregnancy. As soon as you click on SAVE (OPSLAAN), a pregnancy notification will be created immediately – see also chapter 6 Pregnant.
REPORTING PREGNACY
If an employee is pregnant, register this in XS as soon as possible. The system will ensure that you, as the employer, are informed in good time of the legal obligations. Once the employee has been reported pregnant, the application for maternity leave will be initiated.
Please note: In the following situations, you do not need to report Pregnacy in XS:
- Are you insured with Howden? Then make sure your employee data is correctly registered in the Howden’s portal (VDD). Pregnacy notifications should also be submitted via the Howden’s portal.
REPORTING A PREGNACY
You can report pregnancy in two ways.
- Via the Pregnant button in the start menu
- Via searching for the employee in the start menu – via the File search screen in the start screen, search for the Then click ACTION at the top right of the screen and choose Pregnant. Then perform the steps for completing the screen as described in this section.
REPORTING RECOVERY
If the employee has returned to work after illness, you can report the employee fully or partially recovered in XS.
There are two ways to report recovery for an employee.
- Through the button ‘HERSTELD’ at the home page
- Via searching for the employee in the home p – via the File search screen in the start screen, search for the employee. Then click ACTION at the top right of the screen and choose RECOVERY. Then perform the steps for completing the screen as described in this section.
There are 3 possible situations:
- The employee has reported full recovery
- There is (modified) partial recovery
- Terminate the illness process because the employee has left the service or died
Report recovered via the HERSTED button
5 TASKS
when you have reported an employee sick or pregnant you need to perform regular (legal) tasks to manage the pathway. With the help of XS you will be reminded in time of a task and supported with the execution of the task.
5.1 TASKS
On the home page you can find the Tasks overview. This overview is divided into Overdue (Te laat), Perform Now (Nu uitvoeren) and This week (Komende week). It is a short listing of all current tasks.
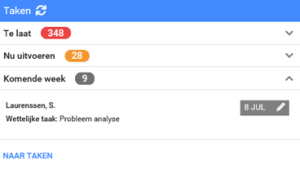
You can tell the status of the tasks by the color:
- Red: the task’s deadline has passed and the task has the highest
- Orange: the task is approaching the deadline to process and has a higher
- Grey: the task is still in time to be
5.2 TASKS TO DO
When you click on the home page under tasks, the complet task overview opens

You will see the following screen:
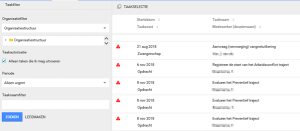
In this overview you can find the tasks that you need to perform your self for the trajectories.
- Click on the task you want to perform. The trajectory will now Now go to the task you want to perform (tip: use the filter to display your tasks clearly).
- For the execution of some tasks (e.g. the Action Plan) a new screen will open with a form that supports you in the execution of the task.
- When you have completed a task of your own, you can change the
- If you deploy a task to yourself it will also appear under “tasks to be performed”. On the left side of the screen you will see the filter options you can use to display the tasks
6 DIALOGUE FUNCTIONS
The dialogue function within XS is used to send secure messages to employees. To access the dialogue function, go to the BERICHTEN tab in the employee’s file
![]()
The following dialogue screen opens:
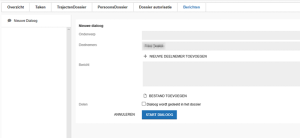
This screen contains the following items:
- Subject -onderwerp
- Participants: here the employees should be added to the dialogue
- Message
- Possibility to add files from a local disk to the
Once the message has been sent to the employee by clicking START DIALOGUE, the employee will receive an email address with which to log in to DialoogXpert. Once logged in, the program is similar to the functions of Whatsapp and dialogues can be held.